

How To Install A Safety First Convertible Car Seat
(Last Updated On: May 15, 2022)
Many of our readers have questions well-nigh rear facing installation of the Safe 1st Guide 65. This seat definitely has some quirks, and then here's the down and dirty, step by step installation guide of the Guide 65.
The Guide 65 is a convertible car seat, which ways it can be used both rear facing and frontward facing. We will be concentrating on the rear facing installation. The first footstep to installing the car seat rear facing is to make sure the foot on the dorsum of the seat is pushed up into the motorcar seat. This allows the seat be reclined in rear facing mode.
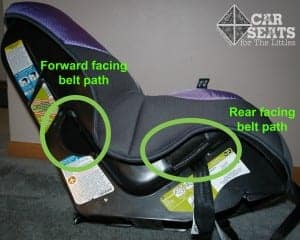
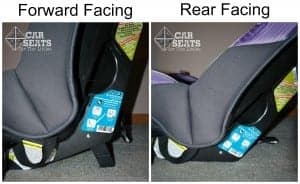
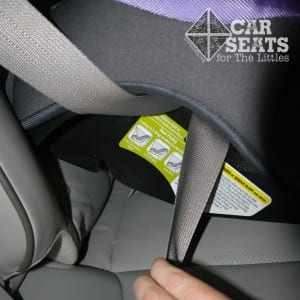
The next step requires deciding if the car seat will be installed with seat belt or lower anchors. I generally adopt to install with lower anchors if possible due to the minor belt path that tends to scrape fingers and the tendency information technology has to tilt when installing with a seat belt that has a switchable retractor. To notice out more nigh locking a seat belt with a switchable retractor, bank check out this link. Afterwards deciding which installation method is best for your situation, the lower anchor connector strap or seat belt needs to be routed through the rear facing belt path on the bottom of the seat.
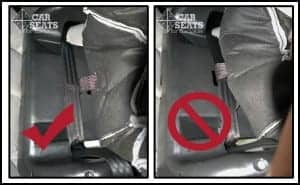
Either installation method will crave the chugalug or lower anchor connector strap to exist routed in front of the crotch strap. ONLY the ii crotch strap positions that are closest to the child are allowed to be used rear facing. Once the seat belt or lower anchor connector strap is threaded y'all will either buckle the seat belt or attach the lower anchor connectors to the vehicle. Earlier tightening, you will demand to cheque the recline level.
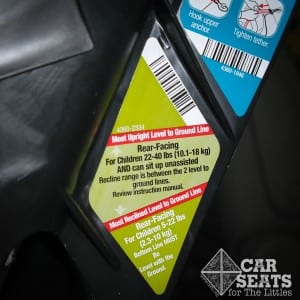 Decide what recline level is needed by checking the sticker on the side of the machine seat. This sticker shows the two different recline levels equally allowed past the manufacturer. Yous tin meet the lesser line is a deeper recline for infants/toddlers up to 22lbs. The top line is more than upright for the larger infants/toddlers in the 22-40 lb range. Using any recline between the 2 lines is adequate, besides, for infants/toddlers in the 22-40 lb range.
To approximate if the seat is at the right recline level, line it upwardly with flat footing or another static point that is parallel to the ground. Hither are some examples of right and incorrect recline levels. The upper line is the line of the reverse window that is parallel to the ground. I've added green lines to extend the correct recline line for 5-22 lb infants and 22-forty lb infants.
 One time you lot've decided which recline level is needed and the seat is in that position y'all volition notice a gap betwixt the seat bight and the bottom of the child seat. You have 2 choices here. You can either install using puddle noodles, a tightly rolled towel OR try for a noodle-less install. Check out this post for more than information on how to install with noodles or a tightly rolled towel. You tin likewise check out this video on how to perform a noodle-less install. I generally prefer the noodle-less install if possible because it gives you a bit more command over the recline level too as the convenience of not needing to find either a towel or pool noodle.
The results should await like to this.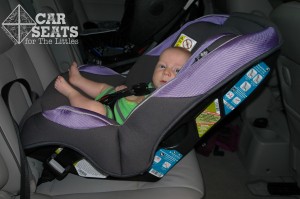
Now that the seat is installed, make sure to double-cheque your work.
- Is the recline level right?
- Is the seat belt or lower anchor connector strap threaded through the rear facing belt path and in front of the crotch strap?
- If installed with the seat chugalug – Is the seat chugalug locked either at the retractor, at the latch plate or is a locking clip being used?
- Does the seat move i″ or less at the rear facing chugalug path? To find out how to bank check this, view our video here.
- If installed without using noodles or rolled towel – Is the car seat pushed tightly confronting the vehicle seat back? To cheque this, button down firmly (you don't need to jump on it) where the child's feet become. Also pull the harness adjuster tail upwardly equally y'all would to tighten the harness straps. The seat recline shouldn't change in either situation. If you tin't become it tight enough against the vehicle seat dorsum, you may demand to apply noodles or a tightly rolled towel.
These helpful hints for installing the Guide 65 is by no ways a replacement to meeting with a certified CPST. To find out what a CPST visit consists of check out this post. To find a local Rubber Kids coalition upshot or fitting station, delight check the Safe Kids website. Even if yous don't have a local Safe Kids Coalition, many communities however have certified CPSTs. Go to Prophylactic Kids' CPS Certification website and click on Find a technician/instructor to find a CPST in your expanse.
Would you like a Rubber 1st Guide 65 to effort this installation out for yourself? Prophylactic 1st is kindly giving one away to ane of our readers. To enter, follow the Rafflecopter instructions below. ***Giveaway is closed. Congrats to Maggie D!***
a Rafflecopter giveaway
Originally written by Angela Tastad. Edits maintained by CSFTL.

Source: https://csftl.org/guide-to-the-guide/
Posted by: broadwatersniters.blogspot.com
0 Response to "How To Install A Safety First Convertible Car Seat"
Post a Comment